Rocky Road Christmas Tree

This is definitely one of my favourite things to make at Christmas. It is really simple to create, tastes amazing and looks absolutely stunning as a Christmas centrepiece! You can adapt it to suit your own tastes - leave out any ingredients you don’t want, and add any you do. It’s also great fun to decorate and add your own special flair. Just a warning: if it looks too good it will be hard to bring yourself to cut it up!

Merry Christmas!


Rocky Road Christmas Tree


Ingredients:
800g milk chocolate
300g honeycomb (can be chocolate coated – which is what I use)
150g glace cherries
110g Turkish Delight (can be chocolate coated– which is what I use)
100g coconut
100g mini marshmallows (or chopped regular-size marshmallows)
100g peanuts
200g white chocolate
200g dark chocolate
Any desired decorations


Method:


Cover a large cardboard sheet with baking paper (secure using good quality sticky tape, or staples – I had some issues with some stickytape being stuck in the chocolate...so be careful!). Roll up into a cone of your desired size and shape, and secure again with tape or staples. Position open end up in a sturdy container – this makes it easier to transfer the mixture to the cone and is used when storing the tree while the rocky road sets in the fridge. Set aside.


Roughly chop the honeycomb, cherries, Turkish delight and peanuts. Transfer to a medium bowl. Set aside.


Melt the milk chocolate. This can be done in two ways:


- Melt the chocolate in a medium-large heatproof bowl in the microwave – break chocolate into small pieces, then heat in microwave in 30 second bursts (not at full power) until melted and smooth. Be sure to stir at each of these 30 second intervals. (If there are only a few small lumps remaining, see if you can stir them out before heating chocolate again, to prevent burning it.)

- Melt the chocolate in a large heatproof bowl set up over a saucepan of simmering water, stirring constantly until melted and smooth. (Be careful to not let the chocolate come into contact with any water or steam, otherwise it will sieze up!)

Immediately after chocolate is melted, stir through chopped honeycomb mixture, coconut and mini marshmallows. Transfer mixture to prepared cone, press down and flatten top with a spatula/spoon. Carefully cover with foil and refrigerate overnight (or at least for a few hours or until hard!).


Carefully unwrap the rocky road from the cone. Take a sharp knife and trim the large bottom end, to allow it to stand straight (unless of course, you like the lopsided look!). Move to a surface flat surface that can get messy (e.g. plate, pastry mat, bench, baking paper). Begin decorating:


To decorate, melt the dark chocolate. Pour over the top of the tree, allowing it to cascade down the sides. Repeat with the white chocolate (it looks like snow!). Alternatively, take a spoon and flick both dark and white chocolate up and down the tree for an effective streaky, stripy look. Add some sprinkles/red or green m&m’s or smarties/coloured decorating balls or cachous/coconut/any other decorations of your preference. Make sure to do this before the chocolate fully sets! (note: if decorating with tinsel, allow chocolate to set a little first, then secure one end of the tinsel to the top of the tree, wind around, then secure the other end to the base – otherwise the tinsel will be fully stuck in the chocolate).


To make a chocolate star for the top: take some melted chocolate and smooth onto a tray lined with baking paper, about 3-5mm thick. Let set for about 20-30 seconds in the fridge, then leave at room temperature until fully set. Take a small star cookie cutter (or star template) and cut out star shapes from the chocolate. Refrigerate stars until hard, then choose one to stick to the top of the tree with some melted chocolate. (Note: you will most likely have to do a few stars as some will break or not come out the right shape)


Return decorated tree to the fridge to set again until chocolate is hard. Store refrigerated.


To serve: place on a chopping board horizontally, and slice rounds of desired thickness with a very sharp knife. Can be sliced further into smaller pieces as required. (Note: the tree can be left out of the refrigerator to slowly warm to room temperature to serve, but be careful of the outside melting a little from the heat of your hands when cutting).

Source: Bec original.

Vanilla Snap Biscuits

Here is yet another recipe for rolled biscuits! But they are just so great for special occasions because they make so many, are quick and easy to whip up and taste so good! These biscuits have a wonderful crunch and great vanilla flavour. They also store extremely well and perfect for gifts or snacks.


Vanilla Snap Biscuits

Ingredients:
185g butter
230g caster sugar
2 tsp vanilla extract
410g plain flour
1 egg + extra egg yolk
Icing (confectioner’s) sugar, to serve


Method:


Sift flour into a medium bowl, set aside.


Cream together butter, sugar and vanilla in a food processor until light and smooth. Add the flour, egg and extra yolk and process mixture again, until combined, and a smooth dough forms. Transfer dough to a flat surface (e.g. bench, pastry mat, chopping board) and knead until smooth (add some more flour if dough is too wet). Form dough into a ball, then cover with plastic wrap and refrigerate for 25-30 minutes.


Meanwhile, preheat oven to 180°C (350°F). Line baking trays with baking paper.


Taking about half of the chilled dough, roll out between two sheets of baking paper to a 5-6mm thickness with a rolling pin. Cut out shapes from the dough using your favourite cookie cutters. Remove extra dough then transfer shapes to the baking trays using a plastic spatula/lifter (be careful, this dough can be a little fragile!). Repeat with remaining dough, taking the scraps and re-rolling.


Bake for 10-12 minutes, or until lightly golden. (For softer biscuits, remove from oven just as edges begin to brown, or for harder biscuits, leave a little longer or until basically the entire biscuit is lightly browned.)


Cool on trays until hard enough to move to wire racks to finish cooling.


Serve dusted with icing sugar, if desired.


Makes between 40-50.


Chocolate Shortbread

This recipe is another great one for Christmas. It is really simple and so easy to make. I also found the dough very straight-forward to work with, it is easy to roll and transfers to the baking tray without any problems! It's also a lovely variation of regular shortbread, and is just as yummy!


Chocolate Shortbread


Ingredients:
300g unsalted butter, softened
220g caster sugar (plus extra for dusting)
375g plain flour
55g cocoa powder
¼ tsp bicarb (baking) soda


Method:

Line baking trays with baking paper.


Sift flour, cocoa and bicarb into a medium bowl. Whisk until combined. Set aside.


Cream together butter and sugar with electric beaters until light and creamy. Slowly beat in flour mixture until combined, and a soft dough forms. Transfer dough to a flat surface (e.g. bench, pastry mat, chopping board) and knead a little until smooth (add some more flour if dough is too wet). Form dough into a ball, then cover with plastic wrap and refrigerate for 10-15 minutes.


Meanwhile, preheat oven to 180°C (350°F).


Transfer dough back to a clean flat surface, lightly dusted with flour. Taking about half of the dough, roll out to about a 1-1.5 cm thickness with a rolling pin. Cut out shapes from the dough using your favourite cookie cutters. Remove extra dough then transfer shapes to the baking trays using a plastic spatula/lifter. Repeat with remaining dough, taking the scraps and re-rolling.


Prick cookie shapes with a fork, then move the cookie-laden trays to the refrigerator to chill another 5-10 minutes.


Bake shortbread for about 20-25 minutes, or until the surface of the biscuits firm up a little (to touch).


Cool on trays until firm enough to transfer to wire racks to finish cooling.

Makes approx. 26 biscuits

Source: adapted from Taste, original recipe can be found here.

Gingerbread Biscuits

I love gingerbread! This recipe produces a really yummy biscuit, and it is heaps of fun to ice them (kids will love to help)! The smell of all the spices is definitely Christmassy so it is obviously perfect for this time of year – add it to your Christmas baking list. They also make great Christmas gifts, wrapped up in cute packaging!

Gingerbread Biscuits

Ingredients:

For the gingerbread biscuits:
125g butter, softened
125g brown sugar
175g golden syrup
1 egg yolk
430g plain flour + extra for rolling dough
15g ground ginger
1 tsp mixed spice
1 tsp bicarb (baking) soda

For the icing:
2 egg whites
450g icing sugar, sifted
Food colouring, if desired


Method:


Preheat oven to 180°C (350°F). Line baking trays with baking paper.

In a medium bowl beat together butter, sugar, golden syrup and egg yolks with a wooden spoon until smooth and combined. Set aside.


Sift flour, ginger, mixed spice and bicarb soda into a medium bowl. Whisk together until incorporated.


Mix the butter mixture into the flour mixture, until dough forms. Transfer to a flat surface (e.g. a chopping board, pastry mat, bench surface). Knead until smooth. Form dough into a ball then fully cover with plastic wrap. Place in freezer for 5 minutes.


Meanwhile, lightly flour a flat surface and rolling pin for rolling out the dough. Take dough out of freezer and take about half and roll between your hands to make another ball. Roll out dough to a thickness of about ½ cm. Cut out shapes from the dough using your favourite cookie cutters. Remove excess dough then transfer shapes to the baking trays using a plastic spatula/lifter (if you have floured the surface sufficiently this should be relatively easy). Repeat with remaining dough, taking the scraps and re-rolling.


(Note: if dough is too dry, moisten your hands with some water to add moisture, and knead a little. If it is too wet, add some flour.)


Bake for approximately 15 minutes or until lightly golden (for a softer biscuit) or until medium brown (for a crunchy biscuit). Let cool on trays until they are hard enough to transfer to a cooling rack.


Once biscuits are completely cool, you can ice them. Lightly beat/whisk the egg whites until they are a little fluffy/bubbly (only about 30 seconds). Stir in icing sugar until combined and smooth and if desired, add a few drops of food colouring. (If the icing is too runny at this stage, add more sifted icing sugar. Alternatively, if it is too stiff, add some lemon juice or water). Fill a piping bag fitted with your preferred tip and ice however you like.

Makes approx. 26


Source: Family friend's favourite recipe!

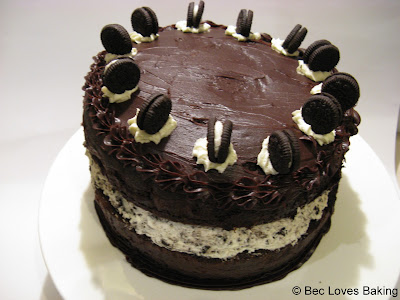
Cookies and Cream Oreo Cake

This cake looks and tastes amazing. And it is HUGE! A fluffy cookies and cream filling, sandwiched between two light, moist chocolate cakes topped with smooth and creamy chocolate ganache. Unlike some chocolate cakes, these are not dense and fudgy, but really fluffy and light, which is great because it avoids the whole thing being overly rich. Perfect for a birthday party cake too!


Cookies and Cream Oreo Cake

Ingredients:

For the cake:
220g all-purpose (plain) flour, extra for dusting tins
450g sugar
85g cocoa powder
1 teaspoon salt
1 teaspoon baking powder
2 teaspoons baking (bi-carb) soda
120mls vegetable oil
240mls buttermilk
1 ½ teaspoons vanilla extract
2 eggs
240mls hot coffee

For the filling:
300mls thickened cream
1 packet oreos, crushed


For the ganache and decoration:
380mls thickened cream
350g dark chocolate, chopped
1 container mini oreos


Method:

Preheat oven to 180°C (350°F). Grease two 20cm (8 inch) round cake tins, then line with baking paper. Then, grease the baking paper (with butter – not cooking spray!), and dust with extra flour.


Whisk together oil, buttermilk, vanilla and eggs, set aside.


Using an electric mixer on a low speed combine flour, sugar, cocoa, salt, baking powder and baking soda. With mixer still running, slowly pour in the buttermilk mixture. Beat until just combined. Then carefully beat in the coffee until mixed through.


Evenly divide cake batter into the two tins (I used my digital kitchen scales to help make sure). Bake for 40 minutes, or until a skewer inserted in the middle of the cakes comes out clean.


Transfer cake tins from oven to cooling racks, and let cool in tins for 35-40 minutes. Then turn out cakes from tins to the racks to finish cooling. Remove the baking paper.


Meanwhile, make the filling. Whip the cream until light and fluffy – don’t make it too stiff. Reserve a little whipped cream for decorating. With the remaining cream, fold through the crushed oreos.


To make the ganache, pour cream into a medium saucepan, and stir over a medium-low heat until it comes to the boil. Add the dark chocolate. Leave mixture on the heat a little more to allow the chocolate to melt more, stirring until smooth and combined. Take of the heat and allow to cool completely to a spreadable consistency.


To assemble the cake, place one cake flat side up on a plate/cake stand. Spread cream mixture on top in a circle, leaving room around the outside to allow the cream space to spread when the other cake is placed on top.


Carefully place the other cake flat side down on top, pressing a little to push the cream to the edges. Spread a layer of ganache on top, and pipe around the edges, using a small fluted tip, and around the bottom (if desired).


Fill a small piping bag fitted with another fluted tip (or whatever tip you like) with the reserved whipped cream, and pipe small rounds evenly around the edges of the cake. Place a mini oreo on each.

Source: Inspired by Brown Eyed Baker and Annie's Eats, Cake adapted from Food & Wine, Ganache adapted from Donna Hay Simple Essentials - Chocolate